Uploading and adding images to TinyMCE editor has never been so easy! :)
TinyMCE – hak_tinymce plugin – lets you add images from a URL or with the txpimage plugin to choose from a list/category, but doesn’t have the upload functionality that we looking for, and this is what we gonna change!
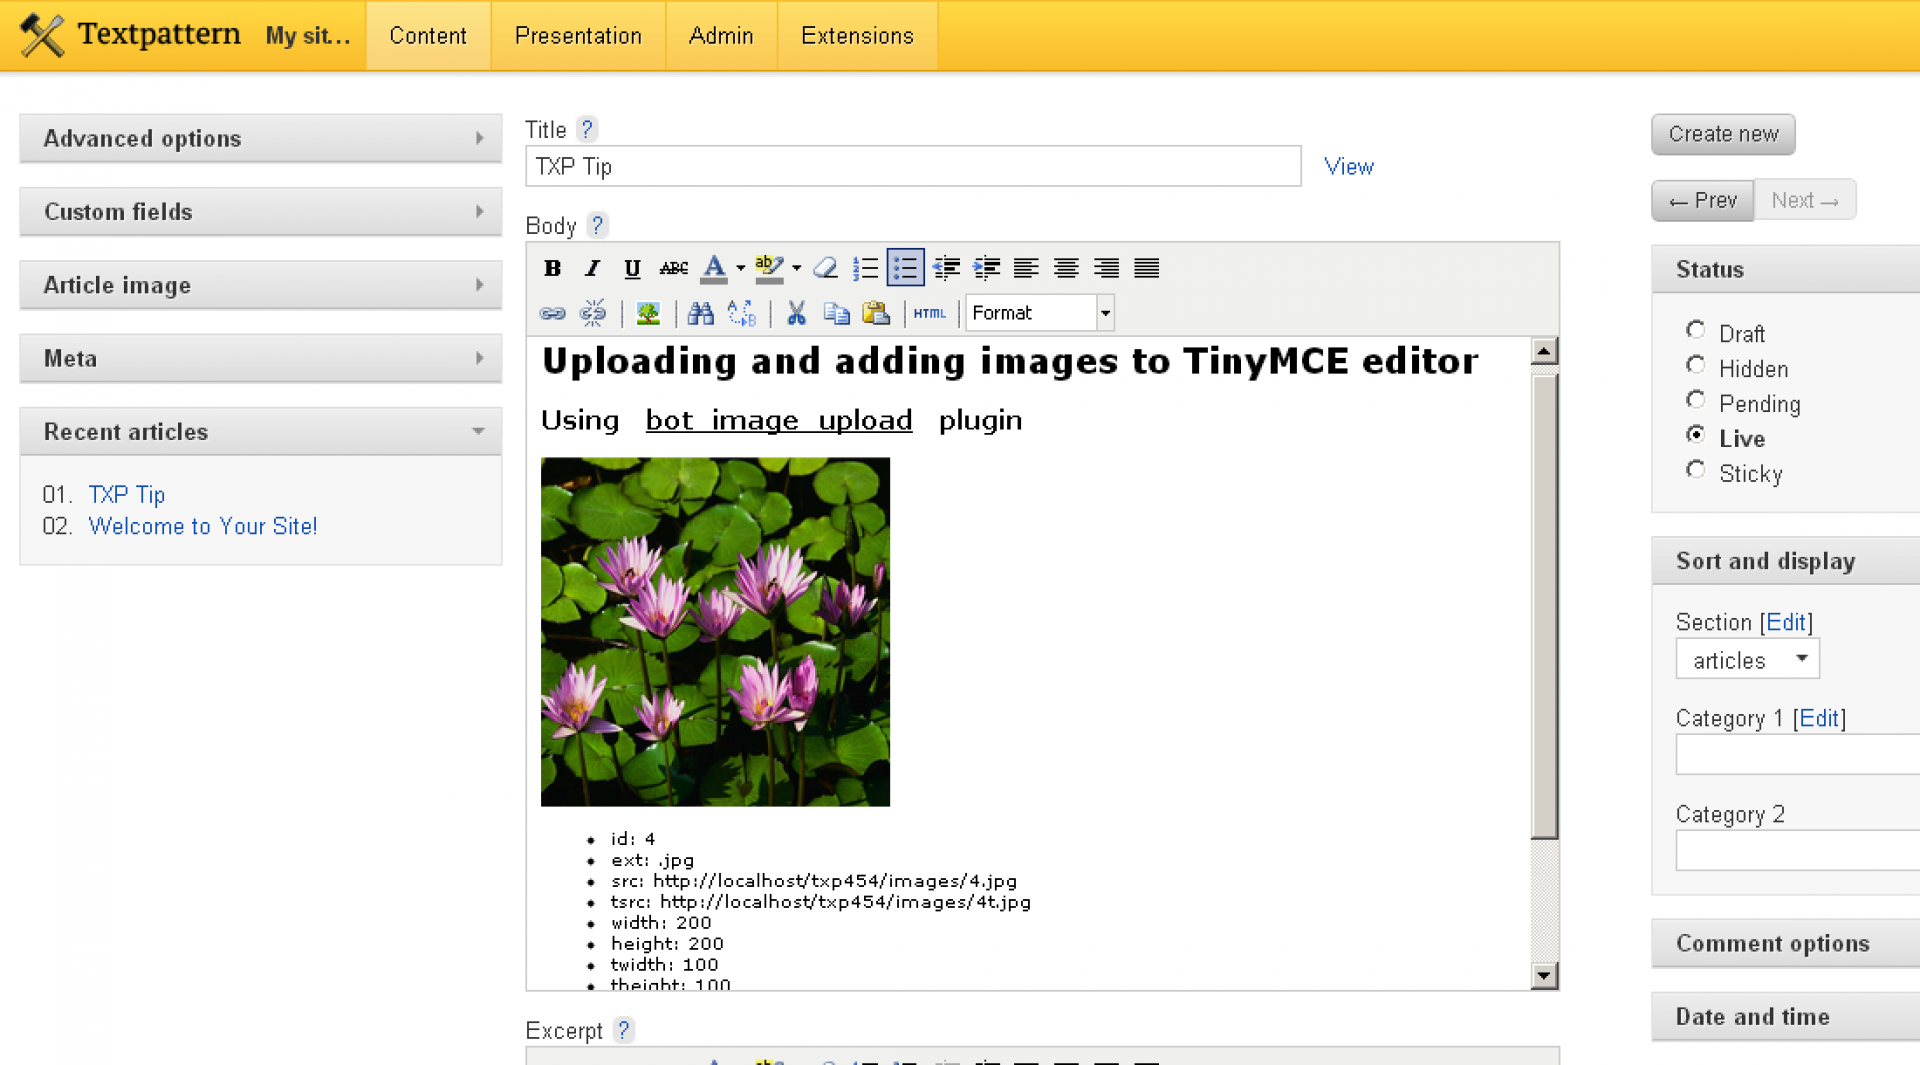
What we do is use the great bot_image_upload plugin, get the images from its field and append them into the TinyMCE editor.
This tip is really simple, probably can be done in up to 5 minutes. Take a look:
First you will need to have the next 4 plugins (you probably already got 2 of them):
After that we can start!
Step #1
Note: 02:10 into the accompanying video.
Go to: Presentation > Forms, and create a new form with the prefix of rah_eo_ and a “.js” extension.
Example: “rah_eo_txp.js”
Then copy and paste the following code into it and save it with the type of “Miscellaneous”:
var get_bot_images_check;

function get_bot_images(){

	// The field to get the images from
	var from_field = '#article-image';

	// Open bot_image_upload
	$(from_field).parent().find('.bot_add_image').click();

	get_bot_images_check = setInterval(function(){
		if($(from_field).val() != ''){
			var images_list = '';

			// Loop to get each image info
			$($(from_field).val().split(',')).each(function(i,v){
				var id = v;
				var bot_image_url = $('.bot_iu_image_container.id'+v+' img').attr('src').split('?');
				var src = bot_image_url[0].replace('t.','.');
				var tsrc = bot_image_url[0];
				var ext = bot_image_url[1];

				// Set Image attributes
				var attributes = {
					src: src,
					alt: 'Example static alt text'
				}

				// Adding extra HTML after, as a line-break for example
				var extra = '<br/>';


				images_list += $('<img alt="" />').attr(attributes).wrap('<div />').parent().html() + extra;
			});

			// Append images to TinyMCE active editor
			tinyMCE.activeEditor.execCommand('mceInsertContent', false, images_list);

			// Clear images from bot_image_upload
			$(from_field).parent().find('.bot_image_delete').click();

			// Clear the checking of every second
			clearInterval(get_bot_images_check);
		}
	},1000);
}
In this code you can set the bot_image upload field which will be in use, by changing the next line (currently set to article-image field):
// The field to get the images from
var from_field = '#article-image';
You can set the attributes of the images in this part of the code:
// Set Image attributes
var attributes = {
	src: src,
	alt: 'Example static alt text'
}
and you can add extra HTML after each image, in this part:
// Adding extra HTML after, as a line-break for example
var extra = '<br/>';
Step #2
Note: 03:50 into the accompanying video.
Now we need to add this JS file into the Write tab, and for this we will use the bot_image_upload plugin.
Below the JS form we just created, there is a button name “View”, this is where you can view the file and copy its URL.
Now go to: Extensions > Write tab customize, scroll down to “Additional js code”, click on it, and then click on “Add external script”. Change “path_to_script” to the url of the JS file we created, and click on “Update”.
Step #3
Note: Video: 04:50 into the accompanying video.
Now the last thing we need is to add a button in the TinyMCE image popup for calling our function. For this you will need to make a small modification to a HTML file inside the “tiny_mce” folder.
Open file: textpattern > tiny_mce > plugins > txpimage > image.htm, scroll all the way to the bottom of it, and change this line (#236):
<input type="button" id="cancel" name="cancel" value="{#cancel}" onclick="tinyMCEPopup.close();" />To this:
<input type="button" id="insert" name="upload" value="Upload" onclick="window.opener.get_bot_images(); tinyMCEPopup.close();" />Save it, and upload to your server. What we do here, is to change the “Cancel” button into our lovely “Upload” one.
Now this should work – see 08:06 into the accompanying video.
Go try it by visiting the “Write” tab, refresh both the page and the TinyMCE image-popup.
Clicking on your new “Upload” button should now close the image-popup and open the bot_image_upload lightbox, where you can upload and choose existing images, clicking on “Save” and be ready to WOW! :P
But!
You may want more then that! What about getting the image alt and caption? Or maybe all the other info like you used with the image_info tag? I took care of that for you too :)
Step #4
Note: 11:38 into the accompanying video.
Go back to the JS form you created in the first step, and change all of the code to the following:
var get_bot_images_check;

function get_bot_images(){

	// The field to get the images from
	var from_field = '#article-image';

	// Open bot_image_upload
	$(from_field).parent().find('.bot_add_image').click();

	get_bot_images_check = setInterval(function(){
		if($(from_field).val() != ''){

			// XML source path
			var xml_src = 'http://example.com/?rah_external_output=txp_tinymce_images.xml';

			var upDate = new Date();
			upDate = upDate.getTime();
			$.get(xml_src+'&images_id='+$(from_field).val()+'&update='+upDate, function(data){
				var images_list = '';

				// Loop to get each image info
				$images = $(data).find('image');
				$images.each(function(i,v){
					var id = $(this).children('id').text();
					var ext = $(this).children('ext').text();
					var src = $(this).children('src').text();
					var tsrc = $(this).children('tsrc').text();
					var width = $(this).children('width').text();
					var height = $(this).children('height').text();
					var twidth = $(this).children('twidth').text();
					var theight = $(this).children('theight').text();
					var category = $(this).children('category').text();
					var category_title = $(this).children('category_title').text();
					var name = $(this).children('name').text();
					var alt = $(this).children('alt').text();
					var caption = $(this).children('caption').text();
					var author = $(this).children('author').text();
					var date = $(this).children('date').text();

					// Set Image attributes
					var attributes = {
						src: src,
						width: width,
						height: height,
						alt: alt,
						title: caption
					}

					// Adding extra HTML after, as a line-break for example
					var extra =
						'<ul>'+
							'<li>id: '+id+'</li>'+
							'<li>ext: '+ext+'</li>'+
							'<li>src: '+src+'</li>'+
							'<li>tsrc: '+tsrc+'</li>'+
							'<li>width: '+width+'</li>'+
							'<li>height: '+height+'</li>'+
							'<li>twidth: '+twidth+'</li>'+
							'<li>theight: '+theight+'</li>'+
							'<li>category: '+category+'</li>'+
							'<li>category_title: '+category_title+'</li>'+
							'<li>name: '+name+'</li>'+
							'<li>alt: '+alt+'</li>'+
							'<li>caption: '+caption+'</li>'+
							'<li>author: '+author+'</li>'+
							'<li>date: '+date+'</li>'+
						'</ul>';

					images_list += $('<img alt="" />').attr(attributes).wrap('<div />').parent().html() + extra;
				});

				// Append images to TinyMCE active editor
				tinyMCE.activeEditor.execCommand('mceInsertContent', false, images_list);

				// Clear images from bot_image_upload
				$(from_field).parent().find('.bot_image_delete').click();

				// Clear the checking of every second
				clearInterval(get_bot_images_check);

			}, 'xml');
		}
	},1000);
}
This code is more advanced then the previous version, here we use Ajax to get info from an XML file that will kindly supply us all the info of each image.
Step #5
Note: 13:28 into the accompanying video.
Create an XML file, for this go and create a new form (Presentation > Forms), and name it with the prefix of “rah_eo_” and an extension of “.xml”. Example: “rah_eo_txp_tinymce_images.xml”
Then copy and paste this code into it:
<?xml version="1.0" encoding="UTF-8"?>
<txp:php>
	global $variable;
	$variable['images_id'] = htmlspecialchars($_GET['images_id']);
</txp:php>
<txp:if_variable name="images_id" value=""><txp:else />
<images>
<txp:images break="" id='<txp:variable name="images_id" />' limit="999">
	<image>
		<id><txp:image_info type="id" /></id>
		<ext><txp:image_info type="ext" /></ext>
		<src><txp:image_url /></src>
		<tsrc><txp:image_url thumbnail="1" /></tsrc>
		<width><txp:image_info type="w" /></width>
		<height><txp:image_info type="h" /></height>
		<twidth><txp:image_info type="thumb_w" /></twidth>
		<theight><txp:image_info type="thumb_h" /></theight>
		<category><txp:image_info type="category" /></category>
		<category_title><txp:image_info type="category_title" /></category_title>
		<name><txp:image_info type="name" /></name>
		<alt><txp:image_info type="alt" /></alt>
		<caption><txp:image_info type="caption" /></caption>
		<author><txp:image_info type="author" /></author>
		<date><txp:image_date format="%d.%m.%Y" /></date>
	</image>
</txp:images>
</images></txp:if_variable>
Save it as a “Miscellaneous” type, and get it’s url by clicking on the “View” button next to its name. With that URL go back to the JS form/file you created (step #4), and replace the path in this line with the XML url.
			// XML source path
			var xml_src = 'http://example.com/?rah_external_output=txp_tinymce_images.xml';
Save it, go back to the “Write” tab, refresh it (Ctrl+F5), and open the TinyMCE image popup, upload/choose an image from the bot_image_upload lightbox, and be ready to WOW once again :)
Note: 17:23 into the accompanying video.
You can of course change the output by changing the “attributes” and the “extra” variables in the JS form/file.
And if you didn’t yet see this tip’s accompanying video, then what exactly you are waiting for?! http://youtu.be/7YfFbfcm_qQ

Enjoy!
Happy Holidays!
Happy NYE!
Gil :)